Friday, July 19, 2013

Finds - A Victorian Tea

Don't let the summer's heat fool you, it is never a bad time for hot tea! Find a shady veranda with a cool afternoon breeze, and pull out your scones!
 Tea for Two french revolutionary steampunk illustration mini print
Like this fine lady, waiting for a duel. From TheGorgonist


 First one will need a suitable teapot, this one from Industrial Safari  is just the thing!
Magnificent VICTORIAN TEA COZY Cosy Gold Threaded Petit Point Embroidery 1800's
 OnceUpnTym Offers this lovely gold thread cozy, just the thing to keep your tea brewing right. 

Antique TV Limoges France chocolate cup, vintage French porcelain tea cup and saucer set, Victorian tea set, green tea cup set
ShoponSherman - One must have just the right tea cup of course.

And these fine wrist adornments will accessorize the tea-going lady with class! Made by BionicUnicorn 

Let us not forget the brew itself, I'm rather fond of this Requiem from DryadTea, spicy and mysterious! 

Don't forget a fan and a proper assortment of wee treats, it's tea time!

Thursday, July 18, 2013

Painting Again

 It's time now to finish up the house painting project, or at least one more room of it. I'll have a new roommate next month, and an exchange student. I wanted to get all the guest rooms taken care of before anyone shows up!

 First came all the prep work. As I have painted this house it has become very clear to me that many people skip this step. There is carpet fuzz stuck to the trim, and switch plates painted to the walls. I took a razor scraper and removed all the funky stuff on the trim. I also patched the big holes in the walls that we used to bolt up bookshelves. Some were really really big *guilty look*.


We then painted the trim white. For some reason simply painting the trim a different color than the walls makes any room look twice as good...

Look at that fabulous green! I wanted light enough to be a bright room, but not pastel at all, and Mr. Crafty vetoed lime green.


My partner in crime (future roommate) did the roller-ing, while I took the green up to the ceiling and flush with the trim. The green glow from the walls mixes nicely with the yellow glow from the sun.

It'll need another coat of roller-ing to get an even color, but I'm already in love with it! This is going to be our young spainiard's room, so I get to do a little bit of decorating for it! I'm on the lookout for some nice lush landscapes and rich red sunsets to hang!
Have you tried a major color change in your house? What color would your dream room be?

Thursday, July 11, 2013

Bike Bag

 My sad little bike bag finally died, after having the zipper split and spill my bike chain once too often. (Confession - I've been meaning to make a better one for a while. I'm not sad.)

So I set about making a new bag, this one will sit on the rear rack instead of attaching to the seat post.
 It's not enough for me to have sturdy denim, I wanted to keep water out too. I recycled some baggies that my CSA veggies are coming in, and ironed it to shrink and melt the bags together. It makes a nice thick layer to keep out rain.
 I pinned the plastic fabric to the denim pieces, and cut it a little bit bigger. The less holes one puts in the plastic to better it will repel water of course, so I tried to keep it simple. I added the fancy fabric first, so there wouldn't be lines of applique stitches in the plastic lining either.

And no, those are NOT my sewing scissors. People who cut plastic with sewing scissors deserve to be put in a bag full of ants.
 I also tucked some cords into the bottom seam to be my tie-ons. Can you believe that I don't have any velcro just laying around? The cords are working ok for now, but I will likely replace them with velcro in the long run.
 After sewing together the pieces I trimmed back all the excess plastic lining. If I lived somewhere that water was a big deal I would do flat-felled seams and seal them like a tent... but I don't.

Also, I'm lazy.
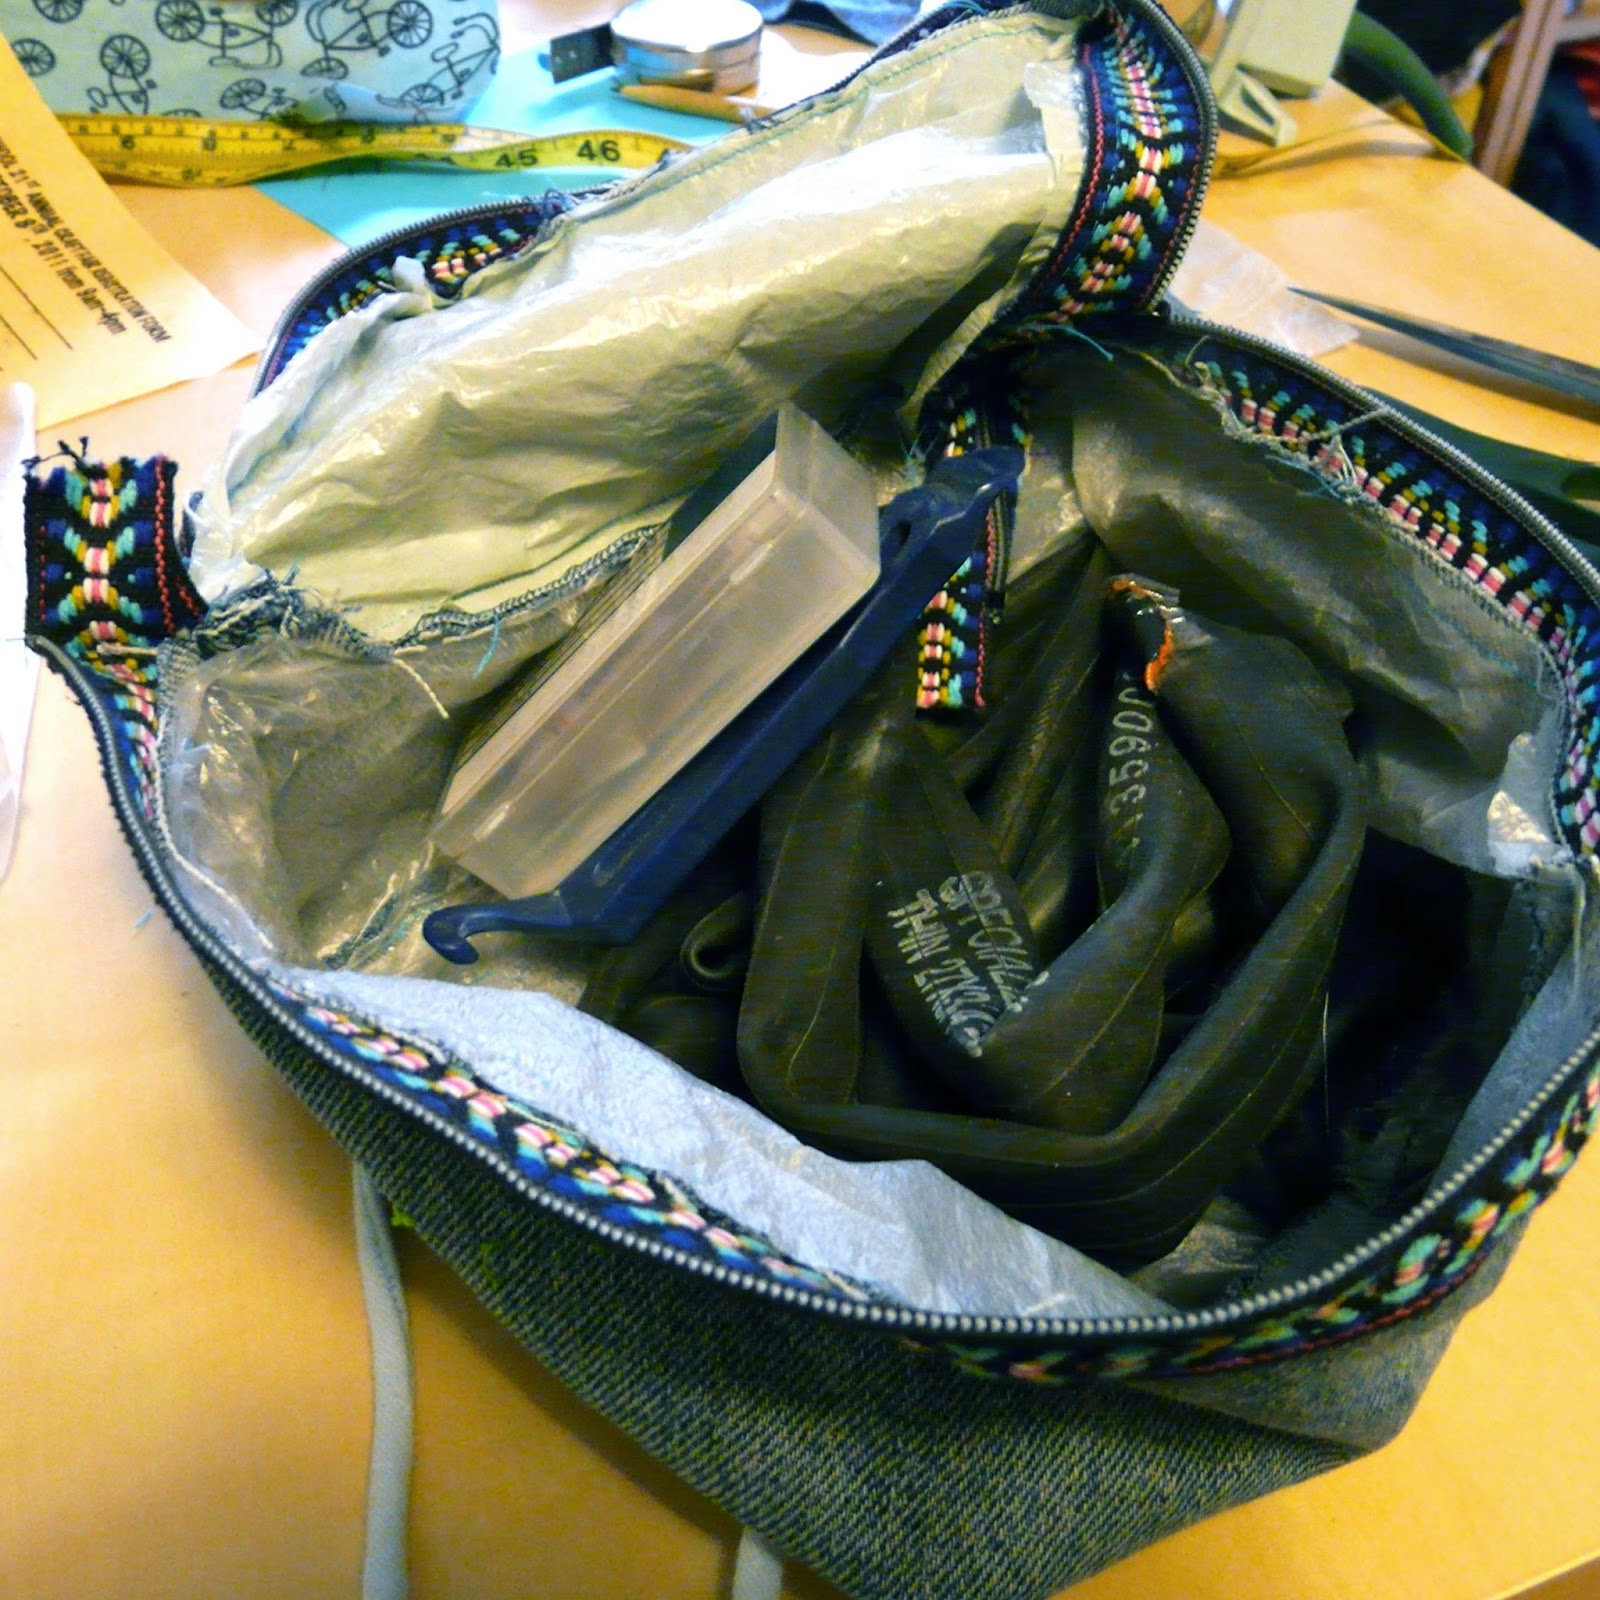
Here's the crazy vintage zipper added to the top. The bag opens on three sides for easy access of tools and such.

On the first test run of the bag, naturally, the zipper failed. After gathering up my chain and tools I vowed to never trust fancy vintage zippers again.
 Look at all that space! Mind you, I haven't had a flat tire for nearly a year *knocks on wood* so this is mostly cosmetic.

"I can fix my own bike! I never do, but I could..."

I do know that I will find more random items that need to be put in here 'just in case'. It's the big purse curse!
Here it is in it's natural habitat. A nice sturdy metal zipper that shows no sign of giving out replaced the broken one, but I kept the ribbon trim.

Ride on!

Have you ever made something for your bike?

Monday, July 8, 2013

I'm a Granny... Square Maker!


 After at least a month of crochet I finally turned a pile of random yarns into a pile of random squares. Fifty of them to be exact. Which gave me a huge sense of accomplishment, followed by the crushing realization that I need to assemble them to actually have a blanket. (Can't we teach the baby to do that itself?)
 I first had to find a properly neutral yarn to tie it all together,  the Sweet Grape from Malabrigo won out as the best choice. Then I edged each square in single crochet.

I laid out the squares in piles of five, trying not to clump similar colors too much. I'm just a little OCD, so it's best for me to not plan everything too closely, that way madness lies..

Then all the strips are stitched together...
Tadaaa! All those random brights and lovely purples blended into a wildly colored blanket. I expect I will use the rest of the Grape yarn to trim the outer edge in a double crochet or such.

Of course, just after taking this photo I spotted one last pile of five squares, the cat had been sleeping on them for a few days. So glad I didn't trim the blanket yet...

What's the biggest thing you've ever crocheted or knitted?

Tuesday, July 2, 2013

Knitting Resources.

 When you are considering your tools needed for the next project, do not neglect your computer! Knitting may be an old-timey, unplugged kind of activity, but there are a plethora of excellent tools available for your crafty pleasure.

If you want to try creating your own charts, or charting out a written pattern, check out this link.

To create a pattern from an image, try KnitPro. I used this for my double knit Metallica scarf (RIP *cry*)

If you're interested in colorwork check out this pattern creator on Tricksy Knitter. It allows you to switch out the colors after charting, so it can also be used to try out different swatches on an existing pattern! Perfect for switching up your Lopi.

For all the little tips and tricks you can stand, check out Techknitter's Blog. She gets into knitty-gritty details (pun intended) about knitting techniques, and offers solutions to problems you didn't know you had.

Almost forgot this last one, Stitch Maps is a new way to chart. Instead of a strict grid system, it uses a flexible set of lines to the chart looks more like the finished knitting!

Do you have a favorite online craft resource?