
Project time again at the house, this time the goal was to build a bar-b-que for grilling our summer bounty of corn, squash, peppers and eggplant. I used the left over bricks from my raised garden beds.

The "grill" parts are actually old cake cooling racks, and I designed the grill around that size. I had a piece of wood cut at the hardware store, and got a long post and 'L' brackets to create a stand for the brick work. My carpentry skills are perhaps a little rusty, but the resulting table seems fairly strong...

Since the table has to support a pile of bricks, literally, I shored up each leg with the brackets. Each leg has 6 screws holding it on, and the resulting stand is fairly hefty.
First I covered he wood with a layer of cement so that the ashes from the charcoal won't burn out the table. It's been a while since I tried laying bricks, and have never worked with holey ones, so things got a little bit messy. It took a lot longer then I expected, if I were ever to try building a house I would be homeless a looong time...

Voilá! Four layers of bricks with spaces to slide the grill racks in and out. The rear of each rack is supported with a few nails set in the masonry. It's just like me - not really pretty, but a great cook! After letting it dry for a day to be totally set up we're gonna start making kebobs and BBQ tofu, bust out the beer and chill in the backyard... aah!
 Project time again at the house, this time the goal was to build a bar-b-que for grilling our summer bounty of corn, squash, peppers and eggplant. I used the left over bricks from my raised garden beds.
 The "grill" parts are actually old cake cooling racks, and I designed the grill around that size. I had a piece of wood cut at the hardware store, and got a long post and 'L' brackets to create a stand for the brick work. My carpentry skills are perhaps a little rusty, but the resulting table seems fairly strong...
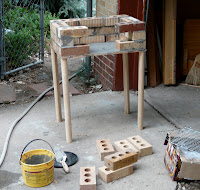
 Since the table has to support a pile of bricks, literally, I shored up each leg with the brackets. Each leg has 6 screws holding it on, and the resulting stand is fairly hefty.
 First I covered he wood with a layer of cement so that the ashes from the charcoal won't burn out the table. It's been a while since I tried laying bricks, and have never worked with holey ones, so things got a little bit messy. It took a lot longer then I expected, if I were ever to try building a house I would be homeless a looong time...
 Voilá! Four layers of bricks with spaces to slide the grill racks in and out. The rear of each rack is supported with a few nails set in the masonry. It's just like me - not really pretty, but a great cook! After letting it dry for a day to be totally set up we're gonna start making kebobs and BBQ tofu, bust out the beer and chill in the backyard... aah!
No comments:
Post a Comment