Showing posts with label clothing. Show all posts

Thursday, March 31, 2016

Steampunk How-to - Bustlin'

For most Victorian costuming, the top is the tricky bit. Getting a fit that is both true to your body, and true to the style can be daunting. For this project I did a mummy draft in corset to work from for making the pattern - see this post for more!

The bustle, however, while less technically difficult is still an important element! The most important factor, is to have enough of it... I had no shortage of fabric, and made generous cuts to ensure adequate yardage. 
The mannequin is a bit busty,
and does not respond to corseting.
First, if you are lining the skirt, cut and sew your lining to fit. That is, the lining should seem like just a large straight skirt. If you are not lining (or your lining fabric is a bit weak,) you will need some strips of sturdy fabric or ticking ribbon for holding up the folds.
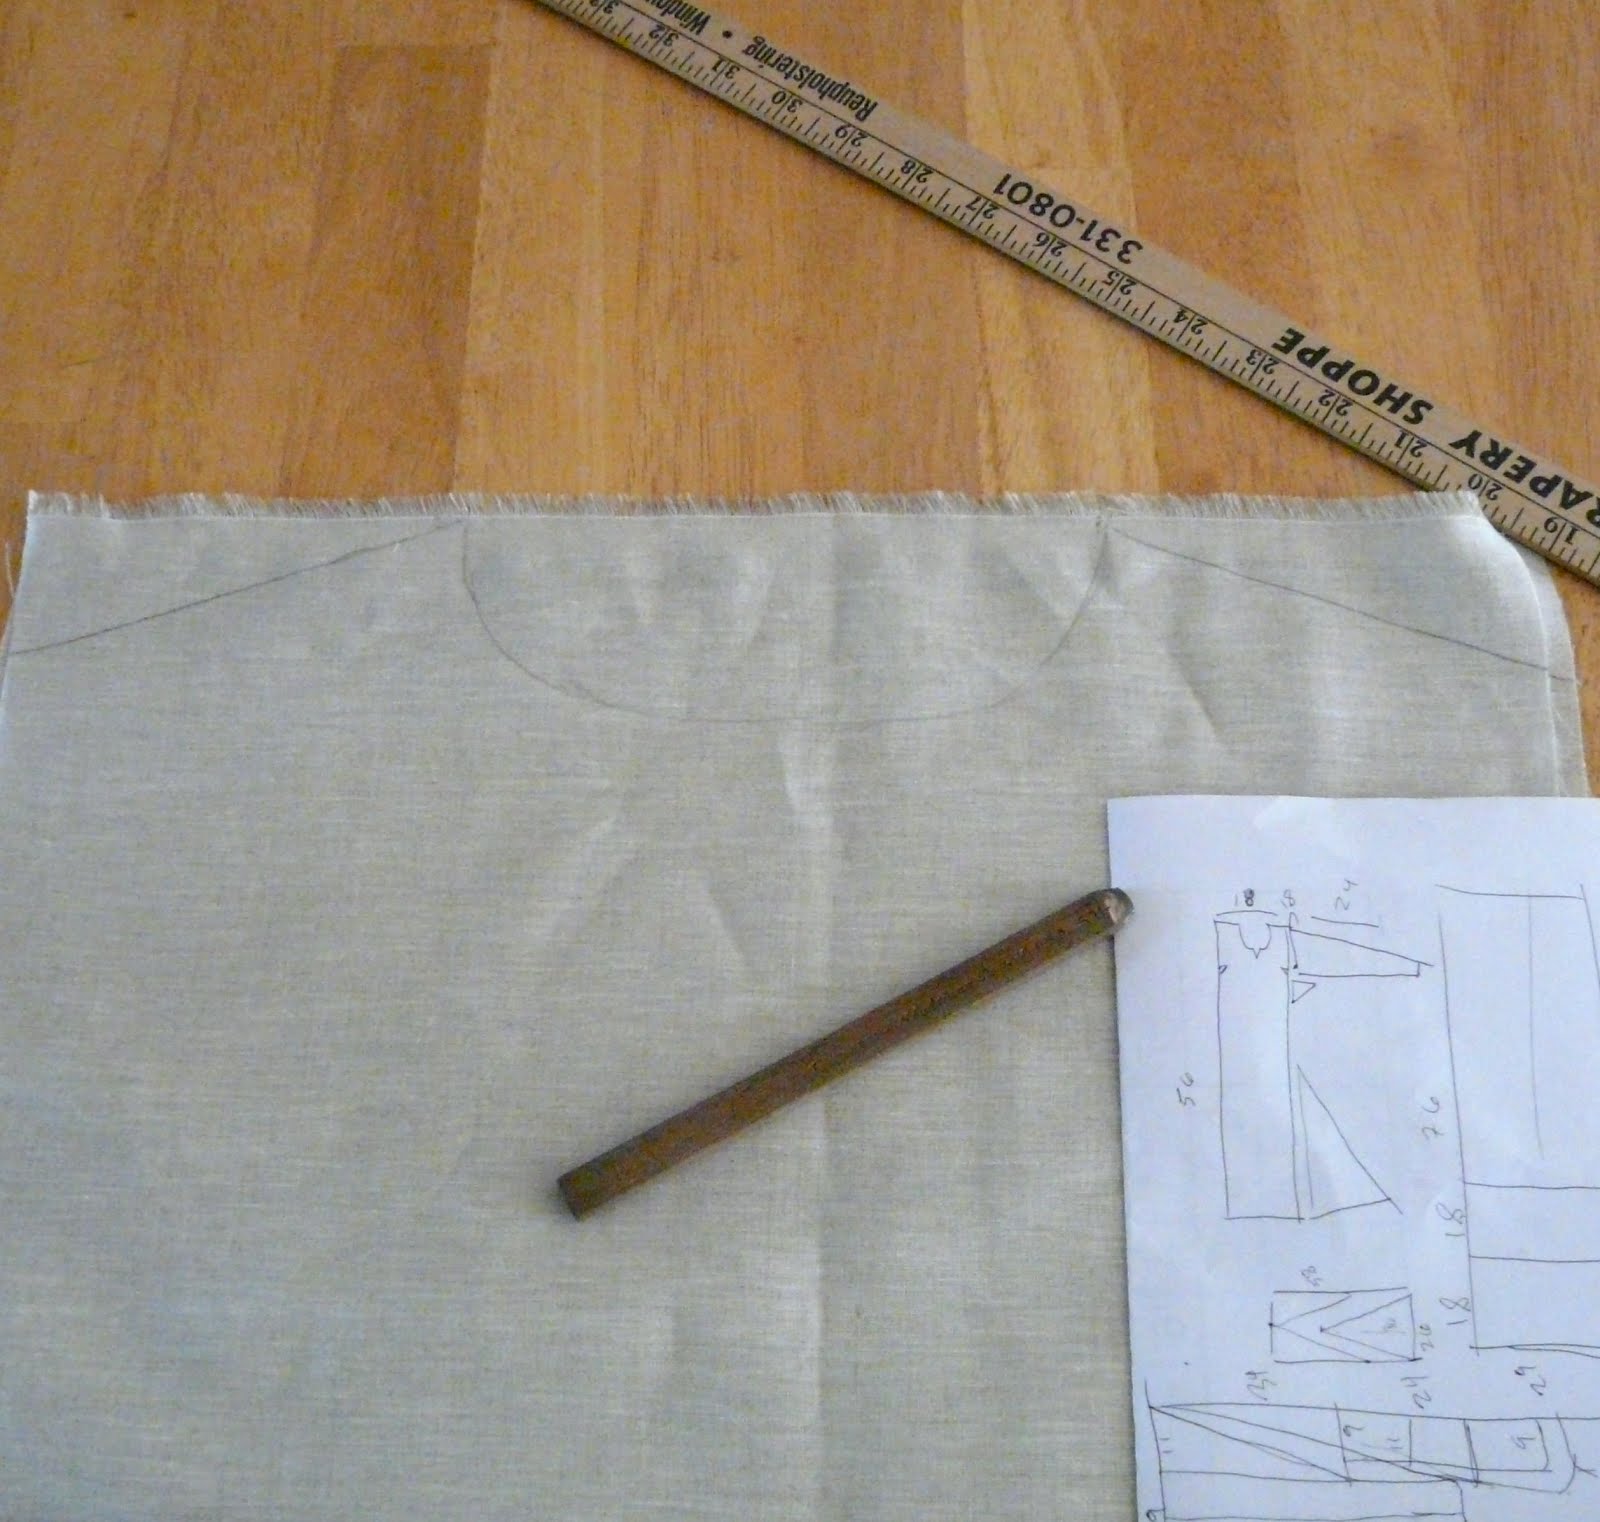
Next, you will want to be sure that your fabric is plentiful. For example, I had 20" of waistband to be this part of the skirt, so the top of my skirt was 24". The lining (and distance from waist to just above floor) was 40", so my outer layer was 52" long.
Soooooo much sewing!
Thirdly, it is best to hang the skirt up while you create the pleats and ruffs. If you have a helper, wear it while they work. If you have a dress form or mannequin, be sure it is at the right height, and if you plan to have a cage or bustle pillow, put it on! (On the form, not on you.) If all else fails, clip it to a hanger and dangle it above the floor at the right height. You will have trouble getting good folds if you lay the skirt flat.
Then, start pinning. I start with the seams, pinning my folds through to the lining below. I try to place the folds at fairly steady intervals, working down. It may take some guesswork and re-pinning to get the right amount of lift. Don't forget to leave enough to fold over and hem! After pinning at seams, if you want more folds, mark a line straight down the fabric and pin along it.

After trying it on, hand stitch each fold. It only takes a few stitches with button or quilting cord to be reasonably sturdy. If you do, in fact, plan to be running from angry mobs of MRAs you may wish to sew a bit extra...
Votes for Women, Tools for All!

The finished skirt should have volume and swish! Note that stiffer fabrics will give the best results, particularly if Madam does not wish to wear bustle prosthetics. 

 The finished product, in front of the organ, at Anomaly Con 2016. I'll do another post in the future about some of the finishing details. E'ry day I'm Bustlin'!

Tuesday, March 15, 2016

Steampunk How-To - Mummy Drafting

I'm no stranger to pattern drafting, in fact most of my costumes have been a custom creation by necessity! Firstly, to create (or recreate) a specific idea. Secondly, because my measurements don't seem to neatly fit a single size category. However, I have had some struggles with my Victorian creations. I finally pinpointed the issue - the corset. 

Corsets do more than tuck in the waist, they completely change the silhouette of the body. I've always managed to make reasonable adjustments for the differing distances between measure points (bust, waist, etc.) but struggles with sleeve holes and collars. The answer to this, is to make the measurements with a corset on... (duh.)

Yep, I'm a genius, right?
So, for the first time, I decided on the cheatyface approach, and got mummified. (Full disclaimer, I was not in fact embalmed.) I got a helper at my job to wrap me up, first with layers of plastic wrap, then with broad masking tape. Lesson one  - let the plastic wrap cover far more than the tape, peeling it off the tops of my boobs hurt. A lot. 

I then cut it into pattern sized pieces, as straight as one can manage on layers of tape and cling film. These were measured and traced, then smoothed out for my pattern pieces. 

Next, I prepared the materials. Oh? You thought I just went and bought some fabric? Where's the fun in that!? Why would I buy fabric, when my parents just cleared out all the curtains from a large room? 
Well, I mean, there is all the work that goes into reclaiming the fabric... but that 70s Victorian revival cannot be beat!

I did the test sewing with some white satin, if it works it becomes the lining. If not, well back to the drawing board! It did need a minor tweak, minor enough to avoid remaking the entire thing. I then used the pieces (notice I'm adding a seam allowance to the fabric, instead of the pattern pieces, this allows me to use the pattern with very different fabrics that might require a different allowance.) to cut my finals. 


Voila! It fit on the first try! Now onto sleeves... and skirt... and bustle... oh my. My consensus on the Mummy method?  10/10 - Would wrap again! (Stay tuned for more post about the finished product...

Thursday, April 2, 2015

Woodland Skirt.

 Every now and again a fabric comes along that just screams at you from the shelf "WEAR ME!" It's hard to believe that this cute little dainty girl holding a soft fluffy bunny would scream like that, but she did. I have witnesses. So I bought a yard and brought her home... and stuck it on the shelf.

Then, as luck would have it, about a year later some other fabrics from the collection went on sale, so I snatched up the remnants and got down to business! This barefoot nature loving girl needed a skirt covered with barefoot nature loving girls!

Of course, one of the challenges of working with such a fabric, is the inhumanity of cutting of feet and heads. So I drafted a pattern to make the best use of each row of girls, and no body-chopping. I ended up with three long strips to be the hem of the skirt. The other two fabrics were then divided into tiers, six panels around, each layer larger at the bottom than at the top. Pockets were made (skirts can have pockets! It's magical, I know.)
 So, a very swishy, swingy skirt was sewn. Perfect for running barefoot in the woods! And how did I get it so swishy? How did I protect the wee feet of these girls?
A bias tape maker, and a trip to the hardware store. Four yards of fine ball chain is sewn into the bias wrapped hem, now it doesn't ride up when I walk or fly up in the wind. Hardward store notions are the best...

Saturday, February 28, 2015

No Waste Sewing (Almost!)

I made a thing! Not just anything, a Hangeroc inspired dress, with functional pockets and a fun swishy hem line. And this entire dress only took two yards of fabric. Yep, two yards.
Why is that number important? I mean, it's not that hard to make a dress with two yards... is it? Actually, it is. For a dress with an ample swingy shape that fits a medium sized frame two yards is almost a miracle. Two yards of fabric means saving lots of money (have you seen the price of fabric?) And also saving a lot of waste.


Let's talk scraps. Because I have lots of scraps. (Seriously, lots) And I LOVE scraps, cute little bits that are a memory of making a piece of clothing. I get bags of scraps from family, friends, estate sales, the local craft shop... sewing makes scraps. 

 This, this is all the scraps I have from making that dress. A few strip from squaring off the end of the fabric, the corners of my pockets, and those triangles are from straightening one section of hem. I think with some fiddling I could do away with that as well.


 How? Well, for inspiration I went back in history, waaaaay back! Consider this, if you have to hand wash, card and pick, handspin, dye, weave, and full every square inch of fabric in a garment, you ain't wasting it! Medieval reenactors have come up with a scheme for making an "Apron Dress" which has only straight line cuts and no waste.

The main shape of the dress is on the bottom of my drawing, the triangles above become the extra gores to make it ample and full, straps, facings, and pockets are all cut from the rest. The main difference from this and a reproduction piece is that I added some shaping for a modern silhouette. Thus, I needed a closure instead of having it loose enough to simply pull over my head.
 And here we are, a few hours of sewing, two yards of fabric - a cute, functional piece. And almost no scraps! Whatever will I use for decorating bags...

Saturday, November 10, 2012

I had a Notion...

 In fact, I have dozens of them. Bags of vintage cards covered in seam bindings and hem tape. I'm not much of a seam finisher, I use french seams when ever possible to reign in those fuzzy ends.

But I must admit, seam binding made an easy option for what would otherwise be a tricky hem! I bought new fabric this weekend (just what I need, it was on sale! Don't give me that look...) I wanted  simple A-line skirt, but I always want pockets! So I cut a pocket opening and a pocket backing. I opted against a hanging pocket since those always ride up on me.

 I dug out some lovely light blue seam binding, and quick as a cat chasing a squirrel who ate the face off a jack-o-lantern it was hemmed. A nice contrast to an otherwise plain skirt.

 It was quick to sew up, the most time was spent on the zipper and four buttons! I bought two fabrics, and I think with the other one I'll make a wider skirt for more fluff! Perhaps the best way to keep the stash under control would be to sew with fabrics almost the same day you get them home...
Oh, and did I mention I finished my heirloom Peardrop? Local Colorado Black Welsh and Shetland in marvelous heathered charcoals. Now I'm ready for my day!

Are you stash building or stash busting? What about using up those old notions?

Sunday, June 17, 2012

Ren Fest Season

Now that I have just about as much cosplay clothing as I can use, I've started attiring my boyfriend. Best way to get him into a dress... I mean *cough* a ROBE...

Tuesday, March 6, 2012

Viking Style

I recently became interested in making an old-world style linen dress. Why? An unusual style, very cool in the hot summers, good for ceremonies and trips to the Ren Fest... the list goes on! I'm also hoping to use it to show off some hand embroidery.

The mos compelling argument for using a viking style construction however, is efficiency. In the days where all threads were hand-spun, all fabrics hand woven, and all clothing hand sewn it was imperative to not create much waste. A well executed apron dress can be created without a single bit of waste! A man's tunic is made by similar concept and is equally careful with waste. This pattern comes from Dragonlore.
I did want something a little more modern, so I combined the sleeve design from a tunic and the gores from a dress. Still, every single cut except the neckline is perfectly straight. How easy is that! The small square will make an armpit gusset, the sleeves are perfectly straight.

After making all my straight cuts I added a bit of shaping for shoulders and a curved neck hole. As you can see from the rough drawings, one can lay out the "pieces" on your fabric for minimum waste. Even better, the small pieces I have left over are rectangles that can be easily used for another project (probably a matching belt bag).
Here's how the armpit piece works, remarkably simple, and surprisingly comfortable. I have a good range of movement, important in a culture where everyone was involved in labor or fighting...
Here's the piece so far. I intend to trim the hems with hand embroidered ribbon, so the completion may be several months out! I would love to have it for wearing to Beltane and Midsummer, a perfect light and airy summer garment. How Retro is that?

Tuesday, December 6, 2011

Dying to Get Some of This!

While digging thru some papers from the 1880s in my mothers storage I came across this little goodie, a cheaply printed and obviously poorly cut booklet from the Diamond Dye company! This was the early days of aniline (coal tar) dyes, synthasized from chemicals instead of extracted from plants. The dyes were much more reliable and light fast than natural dyes, but were (and to some extent still are!) extremely toxic.
This booklet told the tale of a black cat whose kittens were all pure white - totally unfashionable in the Victorian era. So she buys some dye and plunges them all into a boiling toxic dye bath... and they are magically brilliant black for the rest of their lives!
The booklet suggested using dyes to keep up with the latest fashions by recoloring clothing, to dye rags for carpets, to color ostrich feather tips (sure, I have a closet full of those..) and to keep children's clothing looking new(er). While the glowing reviews seem a little forced, the idea that one could keep altering ones clothing instead of getting new things all the time is refreshing. Would you change the colors of your clothes to keep up with the styles?

Monday, November 7, 2011

Slipping Up

It's cold weather season. A cup of tea can warm hands and faces, but not do much for your feet. How about some fuzzy woolen slippers?
I happened to have a bag of sweaters which had met an unfortunate fate in a too-hot washing machine, and this child's sweater is a pathetic little blob of thick wool. Perfect for keeping toes cuddly!
I traced my feet a little big (these are for my boy, his feet are big!) onto faux suede then pinned that to the sweater as a template. I then cut the top front, slightly wider than the bottoms. The rest of the sweater yielded short strips to go around the back of the heel.
I cut a dart out of the top fronts, and sewed that up to make it three-dimensional. I then layered everything ("right" sides together) to start sewing! The suede is sitting in the middle because it will be the bottom. One could also use real leather, recycled denim, or any tough and not-too-slippery material for your base. I whip stitched all the way around joining the heel strips to the sides of my toe covers.
Turn them right side out and check your seams. I used quilting thread, and put a sturdy knot in every inch or so for longevity. Put them on and enjoy toasty feet!
Winter is a great time to upcycle any "oops I put that in a hot wash" wool goods. Have you made any warm things out of old sweaters?

Friday, September 2, 2011

Closet Check

Now I don't consider myself a fashionista, but I do love fabulous clothes. I've been enjoying The Good Closet blog and several post on the Etsy Blog by Elizabeth. She is challenging readers to examine their clothing habits and environmental impact. Fact of the matter is, we cannot go nekkid around our society, and the ways that we costume ourselves has changed hugely over the years. Most changes seem to push away from simple sustainable coverings, and towards disposable (but not biodegradable!) clothing.
So I thought I'd jump in, what's in my closet? Well to start with, I haven't a closet proper, just a hanging rod for dresses, shirts and coats. But even this is an interesting cross-section of my clothing habits. First, 16 dresses, 8 button up shirts, 8 dress coats. Secondly, 10 are handmade (one by my mother, the rest by me); 11 are vintage, 8 were bought used from a thrift store, 3 were bought new. I've owned (as in, possessed in my household) each piece for an average of 5 years; the oldest was about 12 years old, the most recent dress was made less than a month ago.

But that's all just a bunch of numbers right? Well, when you consider the amount of textiles that are discarded everyday in the U.S. there's more to this picture. Have you ever stood in the back room of a charity thrift store and watched boxes pile up full of old clothes? Not all of it will make the shelves, some may be thrown away if it looks beat-up or undesirable. Some will go to outlets to be picked over by opportunity shoppers. Much of that is bailed and shipped to the developing world, dumping last years styles on the world's poor.

And what of it's final destination? Even an old-fashioned mender such as myself finds things may eventually go to a landfill. Cotton, linen, silk, wool and such natural fibers may breakdown eventually, tho the anaerobic environs in a dump aren't conducive to that sort of decay. Synthetics however, are forever. Even as the plastic polymers crumble, the molecules rarely breakdown into base components. Synthetic fabrics such as nylon, rayon, polyester, spandex and the like will never truly return to being organic material.

So what does that have to do with one's closet? Buying less, keeping it longer, and reusing the textiles can help reduce the environmental impact we all have, and it can be done without sacrificing much style! What's in your closet? Check out The Good Closet to read more about Elizabeth's research, and to get more ideas about how your fashion sense can become more eco-friendly.

Wednesday, April 6, 2011

Tutorial - resizing a vintage skirt.

After finding a pile of lovely skirts at an estate sale, and when getting home and discovering that they are all about 24 inches around... I headed for the craft room! I only needed to add a few inches to make this fit at the waist, and since they're pleated there is plenty of extra to go around.

I carefully cut the stitching back on a few pleats until the skirt was the correct width. I decided no to iron down the pleats, since leaving them gave the illusion that the skirt was still pleated all the way around.

I used a piece of wool felt in nearly the same color to fill the gap. These skirts have a sizable hand turned hem, so if I wanted a perfect match I could steal some strips from the bottom and tack the new edge down.

I top-stitched it all in place, and made a new button hole for the existing button. I never even had the touch the zipper in all this, I just made sure that when buttoned the sides still line up.

And now I have a trio of cute vintage pleated wool skirts! My mother remarked that they are exactly what she would have worn to High School (back when girls were not allowed to wear pants, can you believe that!)


On this red and blue plaid there had been a long overlap on the closure, so once I unfolded it a bit it didn't want to sit closed, I just added a zipper to it. I even went dancing in this skirt, it spins like a dream and the waistband is sturdy enough for that kind of excitement.

You don't have the make the changes where the skirt closes. This skirt had a cute little strap closure, so I opened the waistband in the same manner on the far side from the closure. It is always best of change the sizes of garments on the side so the drape of the front and back aren't changed too much.

So never be afraid to grab a good deal just because you can't try it on, there are lots of things to do with that clothing if it doesn't fit quite right!

Wednesday, February 23, 2011

Hooray for Sale Fabric

This Tuesday at Craft Night I made good use of the large tables and pattern weights at Fancy Tiger... and some awesome fabric I got on sale there over the weekend! It's a vintage pattern I've used several times (dates back to when women my size were considered a 14!) and each time I change up the neckline a little. This time the halter strap buttons on with cute vintage buttons! Who's ready for spring?