When ever a new set of cups some out of the kiln I get lots of curiosity about "how did you do that?", so I wanted to post some of the steps involved in making my cups with designs ripped right from classic Japanese images.

First I go through my sources and find a lovely simple scene. This is one of master printmaker Hokusei's landscapes (He's famous for his views of Mt. Fuji... like the one with the wave). And since I was using some others with Fuji San in them I dropped it into the background on my sketch. It really is that big of a mountain that it can be seen from so many different places.

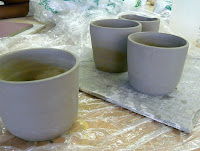
I had already made my cups, trimmed and cleaned up - really ready to be fired for the first time. I use a small knitting needle to lightly etch the design in to the clay (which is still wet and slightly soft). I have to keep the cups wet as I work so that the stains glom on to the clay and don't crack and peel off as they dry.

The colors are applied one at a time, just like the original print was made. I even follow the usual order of darkest to lightest. The stains are made from pure mineral based pigment, a little bit of glass based stuff (frit or silica or what have you...) to make the pigment stick, all thinned with water. Applying them is a lot like water colors with a thin layer being somewhat transparent.

The colors will layer a bit, with the strongest color coming through. So I have to be careful to leave empty the spaces where the lightest colors will be.
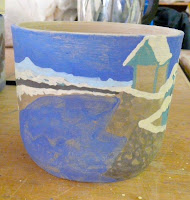
Here's all the colors layered down, I put the white on to make it a snow scene. Not every part had color on it, and the blank spots will be the natural color of the clay - a nice creamy gray off-white. Now the vessel goes in for the first firing (after it's dried of course).

After the first firing its called greenware, and I can apply the final glazes. Mason stains are usually fairly matte, with the areas of heaviest color getting a little bit shiny. I give the outside a very light coat of a satin clear, just enough to seal the clay for foodsafe-ness. The inside gets a nice thick coat of colored glaze. Be sure you glaze the inside first so you can wipe off any drips!
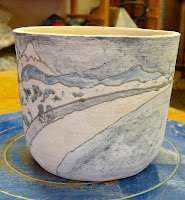
I then put a nice glossy black glaze in a little tine squeeze bottle. I outline everything, and add a few details like the people walking. This is just like the print-making process when the last black plate is used! Now we have to make an offering to the kiln goddess and send it off...

Voilá! The kiln spirits shined upon me (12 items, only one cracked!) and this bowl is finished. The black lines are slightly raised and give a nice texture to it. You can see that the brushstrokes in the water came out in the final firing, and the slight difference between the raw clay color and the white mason stain.

The inside was a commercial glaze, a nice icy blue with touches of lavender. It fired slightly matte, perfect for a set of winter themed cups. I will be redoing the cracked cup and putting these up for sale on
Pink's Pots. Its a long process but worth every second...
 First I go through my sources and find a lovely simple scene. This is one of master printmaker Hokusei's landscapes (He's famous for his views of Mt. Fuji... like the one with the wave). And since I was using some others with Fuji San in them I dropped it into the background on my sketch. It really is that big of a mountain that it can be seen from so many different places.
 I had already made my cups, trimmed and cleaned up - really ready to be fired for the first time. I use a small knitting needle to lightly etch the design in to the clay (which is still wet and slightly soft). I have to keep the cups wet as I work so that the stains glom on to the clay and don't crack and peel off as they dry.
 The colors are applied one at a time, just like the original print was made. I even follow the usual order of darkest to lightest. The stains are made from pure mineral based pigment, a little bit of glass based stuff (frit or silica or what have you...) to make the pigment stick, all thinned with water. Applying them is a lot like water colors with a thin layer being somewhat transparent.
 The colors will layer a bit, with the strongest color coming through. So I have to be careful to leave empty the spaces where the lightest colors will be.
 Here's all the colors layered down, I put the white on to make it a snow scene. Not every part had color on it, and the blank spots will be the natural color of the clay - a nice creamy gray off-white. Now the vessel goes in for the first firing (after it's dried of course).
 After the first firing its called greenware, and I can apply the final glazes. Mason stains are usually fairly matte, with the areas of heaviest color getting a little bit shiny. I give the outside a very light coat of a satin clear, just enough to seal the clay for foodsafe-ness. The inside gets a nice thick coat of colored glaze. Be sure you glaze the inside first so you can wipe off any drips!
 I then put a nice glossy black glaze in a little tine squeeze bottle. I outline everything, and add a few details like the people walking. This is just like the print-making process when the last black plate is used! Now we have to make an offering to the kiln goddess and send it off...
 Voilá! The kiln spirits shined upon me (12 items, only one cracked!) and this bowl is finished. The black lines are slightly raised and give a nice texture to it. You can see that the brushstrokes in the water came out in the final firing, and the slight difference between the raw clay color and the white mason stain.
 The inside was a commercial glaze, a nice icy blue with touches of lavender. It fired slightly matte, perfect for a set of winter themed cups. I will be redoing the cracked cup and putting these up for sale on Pink's Pots. Its a long process but worth every second...
No comments:
Post a Comment