Friday, September 26, 2008


That's right amigos, it's that time of the month again, and I'm not talking 'bout the rag >.< href="http://www.boulderfarmers.org/longmont/longmont-location.htm">farmers market of the year in Longmont at the Boulder County Fairgrounds. From butt early in the morning until 1pm I am surrounded by delicious foods, beautiful flowers, and lots of talented crafters. One of the best things about this show is it is enforced handmade! The organizer juries the booths and she requires everyone to be selling items they made themselves! She also recruits from the locals so it's all Colorado made as well. Pics are my booth from last month when I was between a jewelry maker and knit/croceted kids togs. This time my Dad has volunteered to join me so I'll be able to do some grocery shopping instead of being tied up to my booth.


Then, when this is all wrapped up I'll stuff it back in the car, drive back to Denver, and set up again for the Broadway Open Air Market. Between Zero and First on Broadway is a little plaza that we fill up with hand made goodness. (They usually have space available so crafters with a table and a box of stuff should come around and check it out) This show runs 3-8pm and draws a lot of passerbys from the South Broadway strip. I however find it a little tortuous since it's right next to the Thai joint and I can smell delicious things deep-frying the whole time Yum!

Thursday, September 25, 2008

Welcome to the Sewing Room!

Well, by room I mean closet, like 3'x4' space where one should hang coats. Truthfully I rather like it, this apartments sewing closet came with a set of shelves that have proved invaluable and I have taken to hanging straps and such over the hanger bar. I even found a really cool item, clothes pins with a hanger hook growing out of them. they help me to not bury pockets straps and other small pieces.
That sewing machine in the Lean Green Bernina! Sutibly vintage (1950's) and quite a work horse. Having said that, just after these pictures were taken it seized up and had to be taken to the shop >.< The upside being that now I have time for a blog post! The machine has a variety of decorative stitches as well, and I love to open the top and watch the little wheels go around. I have no idea how they work, but they're cool!
Above the hanger bar are many more boxes of clothes and my yarn stash. I also have crates and bags full of scraps ribbons and general detritus. Oh, and yes, I am sitting on two stacked milk crates. Afro-engineering at it's finest! Not to mention, a real chair wouldn't fit in here!
Final pic is Dante, the critter responsible for the purchase of lint rollers around here. He has, as you can see, found the black fabric because he is a white cat. What a jerk.

Monday, September 22, 2008

Buttons!!!!!


So my Mother, estate sale goddess that she is, brought me home a ginormous bag of vintage beads. More then a pound, perhaps even two, all for seven dollars. I spent several hours the other day sorting them and pairing them up. I can't even count all the pairs/triplets/septuplets etc... and not to mention dozens of orphens in every color imagineable. Now I just need something to do with all the little buttons in shades of white and brown, the ones that come on boring shirts and the like. I didn't even bother to pair them up and I have literally a hundred. Ideas?

Saturday, September 20, 2008

Pants---->Bags Final Part!!

Hallo! If you've seen the other parts of this tutorial, you should be just dying to know, when to we get to the really cool bag? The other bags are reusing clothes as raw pieces of fabric, this is what one might call the "truth" bag. That is, everyone can tell exactly what it is, and it's very exciting for most people to see things being reused in creative ways. (I won't try to take credit for the creativity, people have been making pants bags for years!) 

For the top of the pants I like to do one or two small appliques. These were a smaller pair of pants so they won't make space for too much! Pant tops already have so much going on with pockets and such I often just put and old patch or two on and call it done. With dress pants you can pin the pockets up out of the way to avoid sewing through them, a pocket works poorly when you cut off the bottom half! Try to arrange your appliques so you can sew all the edges easily without pockets, the fly or other structural aspects getting in the way.

For the black I wanted to have a bunch of bright colors to stand out from the backdrop. Pink is also the overwhelming hue here.

After all your appliques are sewn, flip the bag inside out and sew up the bottom. I suggest rounding or gusseting the corners. You will have to cut across the crotch to make it straight-ish, play with it. The pants are designing to fit our three-dimensional bodies so they don't just lay flay perfectly. Flip it back and measure it.

We're going to make a lining for this bag (though totally optional) because Pink likes pockets and she doesn't think it's at all to much to add pockets to a bag that naturally has four. ^.^

I always sew my linings in to the waist band, so I measure from the bottom of the waist band when cutting my lining. One could just as easily sew at the top. Be sure in your measurements you leave enough to fold over for a top hem and that you follow the fall of the pants. Pants are usually shaped like people and the lining should be too in order to fill up the bag.  as with most sewing a little big is better then two small. Before joining the two sides of the lining I sew in pockets to both sides.

I sometimes hem the lining with a decorative stitch just to make full use of my machine, it's a little thing that's fun to discover. After sewing up the sides of the lining and checking the fit I sew it in to the pants and tack the lower corners. If while sewing you discover you have more lining then pants you can just fold over little sections like ruffles on a skirt. The perfectionist will want to pull out the lining and make it smaller. 

The final step will be to make the strap. One could add little  straps for button closures but this bag was somewhat small so I didn't feel it was necessary. The strap is a sash in some psycedelic colors. It was fairly wide so cut it in half to use on two bags. This bag will be "messenger" style with one strap that stretches across it. That is the strap is sewn on the sides of the pants instead of front and back. Make several passes to ensure a sturdy long lived piece.

And there we are! Completion of all three bags usually takes my about 7-8 hours if I don't get distracted by button sorting. For more ideas on things to put on your bag browse flickr or another photo site. Grocery shopping should be a fun and colorful experience, and you bags should match your outfit. In fact one could have functional totes for all seasons and moods just to carry you daily sundries. I use these bags to take books to school, clothes to change, shopping sprees and sometimes just my lunch!

Happy Crafting!

Saturday, September 13, 2008

Pants----> Bags Tutorial pt.2 of 3

 Welcome, this is the second part of the tutorial sharing with the crafty community some excellent reuse/upcycling ideas. These bags are available in my shop. Here's the second bag plan for turning a pair of old pants into three super sweet customized bags! This tutorial assumes you read the first part so scroll down and catch up!

You can obviously put anything your crazy mind can come up with on a bag, in fact most any part of these plans is alterable to fit your desires. Make it you own!

We'll be using the middle pieces of the pants that were set aside earlier, a few pieces of fabric scraps, a large piece of salvaged lining and some strips of fabric for straps.

I cut open the two leg pieces, each one was way longer then it was  tall, so I cut a strip off each side and used them for pockets and closures respectively. They are also somewhat cone shaped, being as they are meant to fit a persons leg. One could A.) Cut the sides such that the two pieces are more rectangular, or B.) flip one piece so the long side of that one fits the short side of the other. Lay out your design on the two pieces and applique! This bag will have pockets on the inside so I chose not to have on the outside. These bats were cut free hand from velvet by folding the fabric over for symmetry. A great gothic look for Halloween!

Now since this bag is a little larger I'm going to "gusset" the bottom, that is fold the corners to give it a flat-ish base. Paper bags are folded in a similar fashion. I sew the sides up and lay it out flat, pin a few inches in from the edge. The further I pin the larger this gusset will be. I then push in the tip to make a T-shaped bit, and sew it. Then just sew across the rest of the bottom. If the pic and description make your head hurt, skip it, it's not that important. Now set aside this piece, we're going to make a lining.

With the Lining you have some options, you generally want it to be as wide as your bag, and measure big! You can always take it in, but it's really hard to add more. You may make it the same height as your bag, or you may add several inches and fold the lining over the top. I like to have extra to add height to the bag. Sew your pockets on first, then sew around the edge, right sides facing each other. Here's the tricky bit, turn the lining pocket side out, kinda like it's own bag. Now right side to right, that is applique touching pockets, start sewing the edge. This is a little like sewing a pillow or a plushie as you will need to leave a few inches open the turn the bag right side out. A bag made with thinner material will fit through a smaller hole, heavy stiff denim will need a larger hole to be left. The first pic shows the pinning, the next how it looks after turning right side out. You will need to hand finish the hole, once again just like a pillow or plushie. Push the lining down into the bag and flatten it out. I sometimes tack the lining down into the corner of the bag to make the finishing easier.

After folding the lining down hem the top edge. I used a fancy stitch and contrasting thread. I'm told that some machines can actually sew in a bat pattern! I'm sooo jealous! The straps were sewn on and two button straps added. The button straps are just a strip folded over and sewn, then turned and sewed flat around the edge. For instructions on sewing a button hole click here.

This concludes this section, the next one will show you how to make a "Butt Bag" from the top section of the pants. Besides being a magnet for compliments these bags are (in my opinion) the most useful with all their pockets and large size! See you then!

Friday, September 12, 2008

Pants----> Bags Tutorial Pt.1 of 3

Alright, many people have ask me to explain just how I do what I do. Here is the full explaination on how to make three bags from one pair of pants. This is a three part tutorial be sure to come back and check for the next installments.

When making your design you can look at my shop for inspiration, or hit up crafster for lots of ideas.

Things you will need:

A pair of old pants - tears and stains add character - don't go and buy a pair of new pants and cut them up.

Fabric scraps - for appliques, decorations, and embellishments.

Handles - these can be made from a long strip of fabric, old ties, and most fabric stores sell commercial webbing strap.

Optional - buttons and other notions for decoration

Let's Get Started!

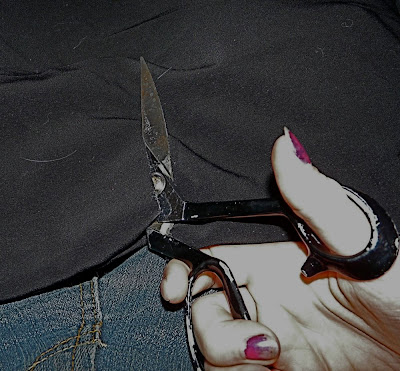
 Take your pair of pants and lay them out. Pin or otherwise affix the front waistband to the back waistband to keep it even. Find the bottom of the pockets and draw a line across to the crotch. You can adjust this line to get the shape you want, but if you cut the bottoms off the pockets, they don't work very well!

Take the legs, and fold them in half. If the have a cuff you may wish to clip and unfold this as well. You should have one pant top, two middles, and two bottoms. Set aside the top and middle. We are going to start with the simplest bag.

This is the pile of stuff I'll be using. The pile on the left is the petals of the flowers. I have a zillion templates I use for flowers, made from cereal boxes for continuous use. The shiny strips will be shoulder straps, the other pieces are for pockets. 

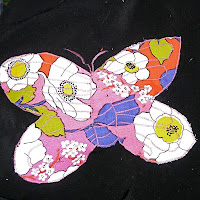
Cut open the two halves of the bottom lay one out, and pin your appliques. Here is a picture of my flowers pinned, and embroidered. One of the flowers got a sewn center, the other two will get vintage buttons. Now take the other half, and sew your pockets on. The smaller pocket is sewn on the inside. The larger pocket is put on the outside to cover the stitches. Amazing invisible pocket!

Sew the two halves together, I like to curve the bottom corners to prevent the build up of lint and fuzzies. I recommend backstiching the tops for sturdiness.

To make the handles I fold a long strip right sides in, and sew up the edge. Turn it and sew up both edges. Using the same technique I make a small strap for closing the top with a button. Sew these all on very well, this it where the most stress on the bag occurs!

Wowza! One and a Half hours to cool tote bliss. For more pics and discription click here. Next part will show making a lined halloweeny bag from the middle section, it will be more involved so get out your Home Ec. textbooks. 

Stay tuned!!!

Tuesday, September 9, 2008

He-he, I have a Blog!

Greeting!!
Welcome to my new blog! Stay tuned for notes on craftiness, Mile High craftiness, tutorials, food,politics,travels, and good ol' plain madness.

First, about myself. My name is Pink Pitcher I'm a 22 year old Denver native. I Have two Etsy shops-
Green Jeans- Recycled totes and other fun things made from reused fabric.
Pink's Pots- Handmade, hand painted pottery.
I also dye and spin yarn, knit, crochet,weave, paint and play with other artsy stuff. I'm a guitarist/bassist/song-writer with a love for eclectic music. I garden and cook, backpack and camp, dance, love, and write comics.

Next post will be a tutorial on how to make your own Butt Bags! Read early and read often.